This article will be a practical guide on deploying ELK stack to Amazon AWS.
Table of content
Deploy ELK stack on Amazon AWS
Setup Amazon AWS
-
Login Amazon AWS with your own creditial via SSH
ssh -i "hongyusuireland.pem" ubuntu@ec2-54-194-211-18.eu-west-1.compute.amazonaws.com
Elasticsearch
Simple installation
-
Download the Elasticsearch package
wget https://download.elasticsearch.org/elasticsearch/release/org/elasticsearch/distribution/tar/elasticsearch/2.2.1/elasticsearch-2.2.1.tar.gz tar -xvvf elasticsearch-2.2.1.tar.gz -
Customize the name of the elasticsearch instance as well as the name of the cluster by modifying the configuration file in
elasticsearch-2.2.1/config/elasticsearch.yml. -
If everything runs as expected, you can read from HTTP server of elasticsearch via
curl -XGET 'http://localhost:9200'You should expect the following message after running the above command. Of course, the name of the elasticsearch instance should match the one you write in configuration file.
{ "name" : "example_name", "cluster_name" : "example_cluster", "version" : { "number" : "2.2.1", "build_hash" : "d045fc29d1932bce18b2e65ab8b297fbf6cd41a1", "build_timestamp" : "2016-03-09T09:38:54Z", "build_snapshot" : false, "lucene_version" : "5.4.1" }, "tagline" : "You Know, for Search" } -
In addition, as we haven’t done any mapping with Logstash yet, you should not be able to see any mapping by running the following command. So running
curl -XGET 'http://localhost:9200/_mapping?pretty'will give you :laughing:
{}
Install as a system service
- As a alternative, we can also run Elasticsearch as a system service with the following lines of commands
Also, stop the service with the commandwget -qO - https://packages.elastic.co/GPG-KEY-elasticsearch | sudo apt-key add - echo "deb http://packages.elastic.co/elasticsearch/2.2/debian stable main" | sudo tee -a /etc/apt/sources.list.d/elasticsearch-2.2.list sudo apt-get update sudo apt-get install elasticsearch sudo service elasticsearch start sudo service elasticsearch statussudo service elasticsearch stop
Logstash
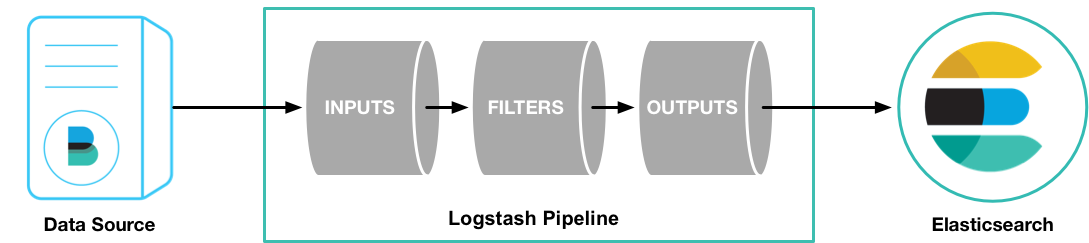
Logstash is a data collection engine with real time pipeline capability. It is able to unify data from different sources. It does data cleanses, democratization, and eventually pipes data into downstream analytics. Logstash works well with Elasticsearch and Kibana. It handles all kinds of log type data and event streaming data, for example, system log, web log, IoT log, databases, and Kafka. Logstash is equipped with a large collection of input plugins which enables a variety of events to be read into Logstash, output plugins which sends data to a variety of destinies, ad well as filter plugins which parses unstructured data, data of different formats, and describes the properties of events.
As highly recommended you should continue with Logstash documentation. But you can also dive much faster with the following steps which will use Logstash to process a toy stock market data.
Simple installation
-
Download the installation package, I will be based on version 2.2.2, many other online Logstash examples are mostly built on version 1.7 which is very very unlikely to be continued.
wget https://download.elastic.co/logstash/logstash/logstash-2.2.2.tar.gz tar -xvvf logstash-2.2.2.tar.gz -
Now we should have a data file to parse with logstash. Well, this should be a log file, but essentially, you can utilize the searching power on any file of similar format. So, let’s download some historical stock data
wget https://gist.githubusercontent.com/chrtze/51fa6bb4025ba9c7c2b3/raw/9ca9e8bc33fd1b81f44b78f830a8e33d0dbf7646/data.csv -
The next thing is to config Logstash with a configuration file in while we will define the pattern of the data file to parse. The configuration file look like in the following code blocks.
   input {
     file {
       path => "/home/ubuntu/elk/data/data.csv"
       start_position => "beginning"
     }
   }


   filter {
     csv {
         separator => ","
         columns => ["Date","Open","High","Low","Close","Volume","Adj Close"]
     }
     mutate {convert => ["High", "float"]}
     mutate {convert => ["Open", "float"]}
     mutate {convert => ["Low", "float"]}
     mutate {convert => ["Close", "float"]}
     mutate {convert => ["Volume", "float"]}
   }


   output {
     elasticsearch { hosts => ["localhost:9200"] }
   }
In particular,
inputblock defines the path of the data file to be loaded into Logstash,filterblock defines the format of lines and converts from string variables to numerical variables, andoutputblock defines the destination of data stream after processed by Logstash. Let’s name this file asstock.conf. -
Run Logstash with this particular configuration file
./logstash-2.2.2/bin/logstash agent -f ~/elk/data/stock.conf -
Ok, if everything runs as expected, with the following commands you can read the mapping status of Logstash from Elasticsearch HTTP server
curl -XGET 'http://localhost:9200/_mapping?pretty'
Install as a system service
-
I would prefer to install Logstash as a software as it is easy to run, debug, and experiment with different settings and configurations. On the other hand, when almost everything are more or less stabilized, we hope to run it as a system service. Follow the lines of commands below in order to deploy Logstash as a system service.
   echo "deb http://packages.elastic.co/logstash/2.2/debian stable main" | sudo tee -a /etc/apt/sources.list
   sudo apt-get update
   sudo apt-get install logstash
   sudo update-rc.d logstash defaults 97 8
You can then start the service and check the status with the following commands. Yep, I guess stopping the service is very straight forward :laughing: you should be able to figure out from
startandstatussudo service logstash start sudo service logstash statusBy the way, if you install Logstash as a system service, the configuration file
logstash.confis located in/etc/logstash/conf.ddirectory. Work on this particular installation file and you should be good :laughing: