Deep Sentiment Prediction as Web Service
I have been thinking for a long while to build a web service for sentiment analysis, the idea of which is tell the emotional positivity (negativity) given a piece of text. Despite of the potentially huge and interesting applications or use-cases, we will be focusing the sentiment analysis for tweets. Basically this article is telling what happened and how.
As a short summary, I have trained a sentiment prediction model using IMDB review data. The model is essentially a Convonlutional Neural Network (CNN) using pretrained sentiment140 word2vec as embedding layer. The implementation of the model is through Keras API running tensorflow as backend. The web service is built with Python flask and hosted in Heroku.
Online demo lives in Heroku accessible via http://sentipred.heroku.com. A bit slow when loading the page but have fun!
Table of content
- Table of content
- Design
- Code Repository
- Deep Learning Model for Sentiment Prediction
- Web Application via Python Flask
- Host the Application with Heroku
Design
The architechture is not very compilcated as shown in the following picture.
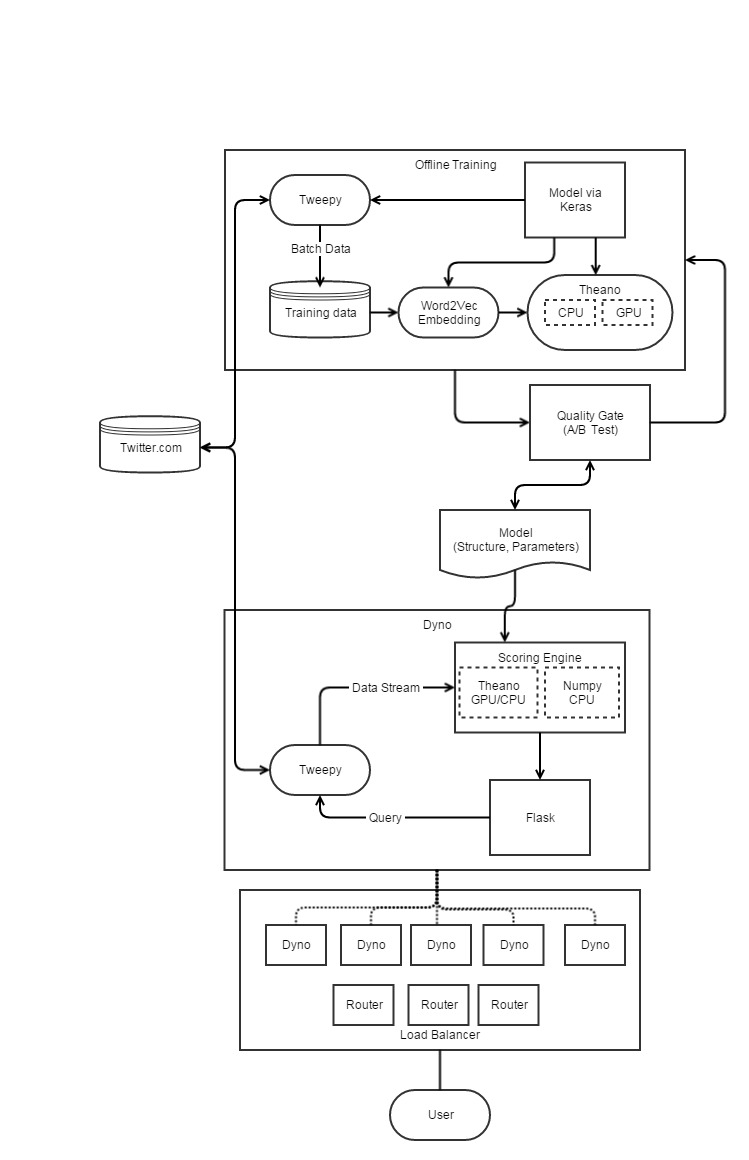
There are two major components, offline training to make a model, a web service utilizing the model for scoring. As tensorflow is running as backend, model training can be done either via CPU or via GPU. Prediction or scoring can only be perform with GPU since currently there is no GPU available for Heroku dyno. In addition, the load balancing is taken care of by Heroku itself.
Code Repository
There should always be a link to the real stuffs.
Deep Learning Model for Sentiment Prediction
-
Full code for learning part can be found from sentiment_predictor.py.
-
A wrapper that ommunicats with Twitter via Tweeter API can be found from wrappter_twitter.py.
Web Application via Python Flask
-
Full code can be found from here.
-
When the url is called, a front page (index.html) will be display which is defined by the following code block in flask
@app.route('/') def index(name=None): return render_template('index.html') -
There is a button defined in index.html, and when clicked an action is triggered. The result is computed by the following code block again in flask
@app.route('/action1', methods=['POST']) def action1(name=None): ht = request.get_json() cPickle.dump(ht,open("hashtag.pickle","wb")) print "---> {} : started".format(ht) os.system("python wrapper_twitter.py") while True: if os.path.isfile("hashtag_res.pickle"): try: data = cPickle.load(open("hashtag_res.pickle","r+")) os.system("rm hashtag_res.pickle") print "---> {} : ended".format(ht) break except: pass return flask.jsonify(data) -
Once the web service is ready, it can be activated offline
python app.pyand tested offline by accessing localhost:5000
Host the Application with Heroku
-
Install virtual environment, the only step requires sudo right
sudo python install virtualenv -
Set up a new virtual environment and name it with venv
virtualenv venv -
Activate the virtual environment
souce ./venv/Scripts/activate -
Install all requirement Python packages
pip install keras==1.0.3 pip install theano==0.8.2 pip install tensorflow==0.12.0rc0 pip install pandas==0.19.1 pip install sklearn==0.08.1 pip install flask==0.11.1 pip install tweep==3.5.0 pip install h5py==2.6.0 -
Create a dependency file requirement.txt which includes all packages and patterns. We do this via
pip freeze > requirement.txt -
Tensorflow needs some special treatment (revision) to the requirement file. So remove the tensor flow line, something like
tensorflow==0.10.0and add one line
https://storage.googleapis.com/tensorflow/linux/cpu/tensorflow-0.10.0-cp27-none-linux_x86_64.whl -
Create a runtime.txt file and add the following line to declare python version used in this web app
python-2.7.12 -
Create a Procfile file and add the following line to specify how to run the application when deployed
web: bin/webalso create the bin/web file with the following content
python app.py -
Version control via Git all required files.
-
Push to Heroku repository
git push -u heroku master